Hello everyone, I am an engineering student, I didn't work a lot with catia so I am messaging you to get some help on a problem I have using the structural analysis module.
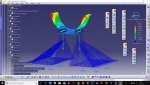
Here is my problem, I want to make a simulation on a product I made (it's a mount for an engine test in a wind tunnel). The issue is one of the part of this product contains several bodies, but when it comes to mesh, I can only mesh the "Partbody", not the Body.4, and I don't why.
So I am waiting for advice and suggestions.
Best regards
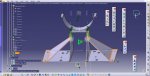
NB: the Body.4 is the one I selected on the screenshot
If you want to analyze all the bodies as a single part;
In the tree, right-click on a Body.x and choose the ADD option. This will add the Body geometry to the Part Body geometry. Repeat for all the other bodies until everything is added to the Part Body. Now you can create the mesh of the entire mounting bracket.
Last edited by MrCATIA; July 16th, 2019 at 11:24 AM.
So I created the mesh for the mounting, and the screws. I added a contact constraint between the screws and the mounting bracket with 200N as a tightening force. But I don't understand why CATIA gives me 10^4mm of desplacement in the perpendicular driection of the force exerted on the screws. They are not supposed to move at all towards this directionCapture d’écran (2).jpg
Problem solved
Last edited by Oasis; July 17th, 2019 at 08:28 AM.
Here is the result. All is grey concerning von Mises, the displacements are displayed as I expected. So, any ideas on how to display the colors for von Mises ?Capture d’écran (4).jpg
Last edited by Oasis; July 17th, 2019 at 10:12 AM.
Ok, so found out how to display it properly. Still need to hide every thing except the screws cause the highest constraint is there. I'll probably find out myself, so thanks again for the answer, and I'll have to figure out how to close the thread now, should be easier.
Hello 3DExperience Fans!
The 3DExperience can be accesses on two levels, using a Web Interface for administrative work, or the Rich Client for content development.
This video is an introduction...
Respectfully
I waited for an instruction but as I didn't receive any respond, I had to find an alternative myself and eventually could to recreate the back surface and connect it to the front...
Hello
After a few days effort, labor and exercise I finally could simulate the front layer of the seat approximately, but now I don't know how to create the back layer. Please offer a method that...
I had the computer time today from 19-23 in fact i used the siemens nx for approximately one hour and still have 20 minutes but it is tiring and time consuming(especially doing multitasking)
...
Hi guys Fortunately I wrote help and I found out that moving the object is with ctr +t big success big progress.
but the program turned off I turned again on I ould not use the search button...
Hello 3DExperience Fans! The 3DExperience can be accesses on two levels, using a Web Interface for administrative work, or the Rich Client for content development. This video is an introduction...
Web Dashboard Organization -...