Continue to Site

Welcome to 3DCADForums

Join our CAD community forums where over 25,000 users interact to solve day to day problems and share ideas. We encourage you to visit, invite you to participate and look forward to your input and opinions. Acrobat 3D, AutoCAD, Catia, Inventor, IronCAD, Creo, Pro/ENGINEER, Solid Edge, SolidWorks, and others.

Making cones with an arc in Catia

jetrcr

New member
Hello all,
New to the site and I'm hoping to get some help. I am a Product Engineer but I sometimes make my own drawings, meaning I know how to use Catia but I don't use it every day and I work mainly with solid models. I'm trying to design a tube made of sheet metal and the best way I would describe it would be; it would be like a cone (small dia of 3.75", large dia of 7", length around 12") but instead of having a straight axis in would be a curve (90 degrees). So basically it's an elbow with two different diameters. I started with a 5" radius and developed a spline to the diameters I wanted but I don't know how to rotate the spline around the radial axis to make the model.

Fyi, the plan will be to send the model to a company to produce a die to stamp the sheet so it really doesn't matter if it is a solid or just the outer surface.

Any ideas on how to do this?

Thanks!
Jim
 
Jim, you can model this shape very easily with the Multi-Section Solid command in Part Design.

Start with 3 sketches; one sketch being the curved 12" centerline of the cone, and the other two sketches being the circles at each end.

Then you can use the Multi-Section Solid command.

If you want to hollow out the tube, use the Shell command.
 
Thanks!

Jim, you can model this shape very easily with the Multi-Section Solid command in Part Design.

Start with 3 sketches; one sketch being the curved 12" centerline of the cone, and the other two sketches being the circles at each end.

Then you can use the Multi-Section Solid command.

If you want to hollow out the tube, use the Shell command.

Wow! that was easy!

Thanks for the help!

Jim
 
Thanks! I tried what you said and I had no issues. Unfortunately the curved portion is not exactly what I want. What I'm looking to do is; start at the smaller diameter and progress to the larger diameter in a uniform manner. Would I be able to use the same method you describe but instead of using only the starting and finishing circles, use multiple circles that the curve would have to go through?

Thanks!
 
Sure - you can have as many intermediate cross sections as you want. Just make sure each sketch plane is perpendicular to the centerline.

Could you attach a picture of what you're doing? It would help me suggest the best solution.

There is a similar command in the Generative Shape Design workbench; Multi-Section Surface. This command provides even more control than the solid command, such as making the surface tangent to mating surfaces at the ends.
 
Last edited:
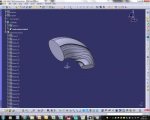
Here is what I got so far. It's supposed to look like an exhaust head pipe for a two stroke engine. I looks okay but you can see the distortion.

Pipe.jpg
 
I see the solid is twisted, which is easy to fix by adding some closing points to define how the solid transitions through the sections.

Here's what I would do:
1. switch to the GSD workbench
2. PROJECT the 0,0,0 origin point onto the small circle to get the closest point
3. repeat the PROJECT with the large circle (and any other sections you may have added)
4. switch back to the Part Design workbench
5. edit the Multi-Section Solid
6. click on the first section, and select the corresponding projection point (PROJECT.n will be displayed in the Closing Point column)
7. click on the next section, and select it's projection point (do this for all the sections)
8. verify all the red arrows are in the same direction (clockwise or counter-clockwise) - select arrow to invert (looks OK in the image)
9. click on the COUPLING tab and verify it is set to RATIO
10. OK to rebuild the solid
 
Last edited:
Wow! Thanks again! That really helped me a lot! I realize this might be every day stuff for you and other people on this forum but for a guy like me who is trying to learn as I go this is a huge help! You saved me a ton of time and I very much appreciate it!
Jim
 

Articles From 3DCAD World

Sponsor

Back
Top